How to Add Large Video to Webflow – Step by Step
Today, we're diving headfirst into the wild world of web design, where every pixel counts and every byte matters. We're about to tackle one of the most electrifying challenges: adding a large video to your Webflow site.
In Webflow, the default file upload limit is set to 10MB for single-file uploads and 30MB for background videos. Now, let's be real. We're not talking about just any video here. We're talking about a video so large, so eye-poppingly crisp, that it'll make your visitors' jaws drop and their bandwidths quake. But before we get ahead of ourselves, we've got some expert maneuvers to navigate. So, grab tight your mouse, and let's roll.
Step 1: Prepare Your Video
Before you unleash your cinematic masterpiece onto the web, you've gotta get it web-ready. That means compressing that bad boy until it's lean, mean, and ready to stream. Think of it like fitting a sumo wrestler into a sleek sports car – it's all about that optimization game.
- Optimize your video for web viewing by compressing it using video editing software or online tools. Aim for a balance between quality and file size to ensure faster loading times.
- Convert the video to a compatible format supported by modern browsers, such as MP4, WebM, or OGG.
Step 2: Upload Your Video to Webflow
Time to play digital DJ and drop your video onto the Webflow stage. Head over to the Assets panel, hit that upload button like it's the drop in your favorite EDM track, and let the uploading magic begin. Remember, the bigger the video, the longer the upload time, so go grab a coffee – or two. Now, one step at a time:
- Log in to your Webflow account and open your project.
- Navigate to the page where you want to add the video.
- Go to the Assets panel by clicking on the "Assets" tab in the left sidebar.
- Click on the "Upload" button and select your optimized video file from your computer. Wait for the upload to complete.
Step 3: Add a Video Element
It's showtime, folks! Drag that Video element onto your canvas like you're Picasso with a penchant for pixels. This is where your video finds its spotlight on the digital stage.
- Drag and drop a Video element onto your page canvas where you want the video to appear.
- Click on the element to select it.
Step 4: Configure the Video Element
Lights, camera, action! Click on your freshly dropped video element and dive into the settings like you're uncovering buried treasure. Choose your video, tweak those playback settings, and make sure your fallback game is strong for those pesky non-video-loving browsers.
- In the settings panel on the right, under "Video Settings," click on the "Choose Video" button.
- Select the video file you uploaded earlier from the asset manager.
Step 5: Adjust Settings
Time to fine-tune your masterpiece. Autoplay? Loop? Mute? It's your call, director. Just remember, with great power comes great responsibility – don't go blowing out your visitors' eardrums (unless that's the vibe you're going for).
- Configure playback options such as autoplay, loop, and mute according to your preferences and site design.
- Set fallback images or text for browsers that don't support video.
Step 6: Publish Your Site
You've crafted a digital symphony, and now it's time to share it with the world. Preview, tweak, and when you're ready to drop the mic, hit publish and watch your creation light up screens around the globe.
- Once you've added and configured the video element, preview your site to ensure everything looks and functions as expected.
- Publish your site to make the changes live.
Step 7: Test and Optimize
Last but not least, it's time to put your masterpiece to the test. Whip out those devices, fire up those browsers, and make sure your video sings on every screen. And if things start to slow down, remember: optimization is your best friend.
- Test your website on different devices and browsers to ensure the video loads correctly and doesn't cause any issues.
- If the video significantly impacts page load times, consider further optimizing it or exploring alternatives like using a video hosting service or embedding the video from platforms like YouTube or Vimeo.
Ok this was an easy part. But what to do when your video is bigger than 30MB?
Use CDN (Google Cloud, Azure, AWS)
At Digi2, we use Google Cloud Platform on a daily basis. Yes we also have Azure and AWS projects but GCP is our choice. Mostly because of the integration between Google Analytics 4 and BigQuery and other Google tools.
So howto add large videos (bigger than 30MB) to Webflow projects?
Step 1: Prepare Your Video
Ensure your video is optimized for web delivery by compressing it to reduce file size while maintaining acceptable quality. This step is crucial for enhancing streaming performance and accessibility.
Step 2: Log Into GCP Account
It’s time to step into the cloud, where the sky’s the limit. Enter the realm of Google Cloud Platform, your backstage pass to a world of endless storage and seamless streaming.
Step 3: Go Into Cloud Storage
Navigate to the Cloud Storage section within your GCP account. This is your video’s new home, where it’ll be safe and sound, ready to be called upon for its grand debut.

Step 4: Upload Your Video
Lift your video up to the cloud with the ease of a maestro conducting a symphony. Watch as it ascends gracefully, ready to be summoned to the stage at a moment’s notice.
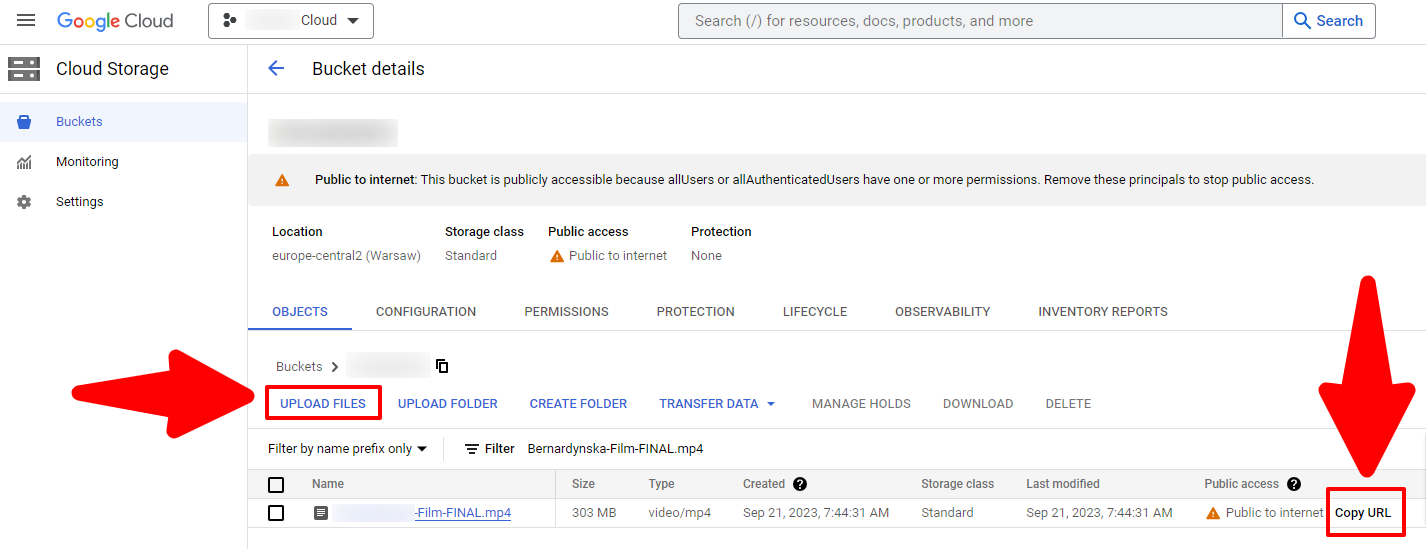
Step 5: Copy Video URL Address
With your video nestled in the cloud, snatch that URL like a golden ticket. This link is the bridge between your video and its adoring fans on Webflow.
Step 6: Go Back to Webflow Project
Return to the land of Webflow, where creativity meets construction. Your project awaits, the canvas for your video’s grand exhibition.
Step 7: Add Embed Element
Unleash the power of embedding, the magic wand that brings external content into the heart of your Webflow site. It’s like opening a portal to another dimension, right on your page.
Step 8: Paste The Code
With the precision of a poet, paste the embed code into its rightful place. This is the incantation that will summon your video from the cloud to the screen.
<video autoplay muted loop width="100%" height="100%">
  <source src="{!!! PASTE_YOUR_VIDEO_URL_HERE !!!}" type="video/mp4">
</video>
Step 9: Replace Video URL
In the embed code, swap out the placeholder with your video’s unique URL. It’s like giving your video the key to its new digital home.
Step 10: Publish Your Site
Hit that publish button with the flair of a showman ending a performance. Take a bow, for your video is now live, ready to captivate audiences far and wide.
And there you have it, fellow digital daredevils! You've conquered the art of adding a large video to your Webflow site like a boss. So go forth, unleash your creativity, and remember: the web's your playground, so play hard, play smart, and above all, have fun!
But if you prefer to let us take care of your Webflow site ourselves, know that we are always at your service. Just let us know HERE [click]. We'll get back to you as soon as possible and talk about how we can lighten your load and create something great. :)